
Introduction to Spring AI
For the longest time, integrating Large Language Models (LLMs) into Java applications felt like a chore. While Python developers enjoyed elegant libraries like LangChain, we were stuck writing raw RestTemplate or WebClient calls to the OpenAI API, manually parsing complex JSON trees just to extract a simple text response. If you’ve been wondering how to use Spring AI with OpenAI to solve this exact problem, you are in the right place.
In my experience building AI-powered microservices, Spring AI is a massive game-changer. It provides a clean, portable, and fluent API that abstracts away the underlying HTTP requests. Whether you want to generate text, stream responses, or map AI outputs directly to Java Records, Spring AI makes it feel like native Spring Boot development.
In this tutorial, I’ll walk you through exactly how to set up Spring AI with OpenAI, from your very first prompt to advanced structured data parsing.
Prerequisites
Before we dive into the code, let’s make sure you have your environment ready. Spring AI relies heavily on the latest Spring framework capabilities, so you’ll need to ensure your baseline is up to date.
- Java 17 or higher: I highly recommend Java 21 if you can, to take advantage of virtual threads.
- Spring Boot 3.2+: If you aren’t familiar with the latest updates, check out my guide on Spring Boot 3.2 new features to see why this version is crucial.
- An OpenAI API Key: You can generate one from the OpenAI developer dashboard. You’ll need a funded account (even $5 is plenty for development).
- Maven or Gradle: We’ll use Maven in our examples.
Step 1: Adding the Spring AI Dependencies
Currently, Spring AI milestones are hosted in the Spring Milestone repository, so we need to add that to our pom.xml first. Then, we can pull in the specific OpenAI starter.
Add the repository:
<repositories>
  <repository>
    <id>spring-milestones</id>
    <name>Spring Milestones</name>
    <url>https://repo.spring.io/milestone</url>
    <snapshots>
      <enabled>false</enabled>
    </snapshots>
  </repository>
</repositories>
Next, add the dependency management and the OpenAI starter:
<dependencyManagement>
  <dependencies>
    <dependency>
      <groupId>org.springframework.ai</groupId>
      <artifactId>spring-ai-bom</artifactId>
      <version>1.0.0-M1</version>
      <type>pom</type>
      <scope>import</scope>
    </dependency>
  </dependencies>
</dependencyManagement>

<dependencies>
  <dependency>
    <groupId>org.springframework.ai</groupId>
    <artifactId>spring-ai-openai-spring-boot-starter</artifactId>
  </dependency>
  <dependency>
    <groupId>org.springframework.boot</groupId>
    <artifactId>spring-boot-starter-web</artifactId>
  </dependency>
</dependencies>
Step 2: Configuring Your OpenAI Key
Spring Boot makes configuration incredibly simple via autoconfiguration. Open your application.properties or application.yml file and add your API key.
Pro Tip: Never hardcode your API key. Pass it via an environment variable.
spring.ai.openai.api-key=${OPENAI_API_KEY}
spring.ai.openai.chat.options.model=gpt-4o-mini
spring.ai.openai.chat.options.temperature=0.7
By default, Spring AI uses gpt-3.5-turbo, but I highly recommend explicitly setting it to gpt-4o-mini or gpt-4o for better performance and cost-efficiency.
Step 3: Creating Your First AI Controller
In modern Spring AI (version 1.0.0-M1 and later), the recommended way to interact with models is using the fluent ChatClient API. The Spring Boot starter automatically configures a ChatClient.Builder for you.
Let’s create a simple REST endpoint to test our integration.
import org.springframework.ai.chat.client.ChatClient;
import org.springframework.web.bind.annotation.GetMapping;
import org.springframework.web.bind.annotation.RequestParam;
import org.springframework.web.bind.annotation.RestController;
@RestController
public class ChatController {
private final ChatClient chatClient;
public ChatController(ChatClient.Builder chatClientBuilder) {
this.chatClient = chatClientBuilder.build();
}
@GetMapping("/api/chat")
public String chat(@RequestParam(defaultValue = "Tell me a programming joke") String message) {
return chatClient.prompt()
.user(message)
.call()
.content();
}
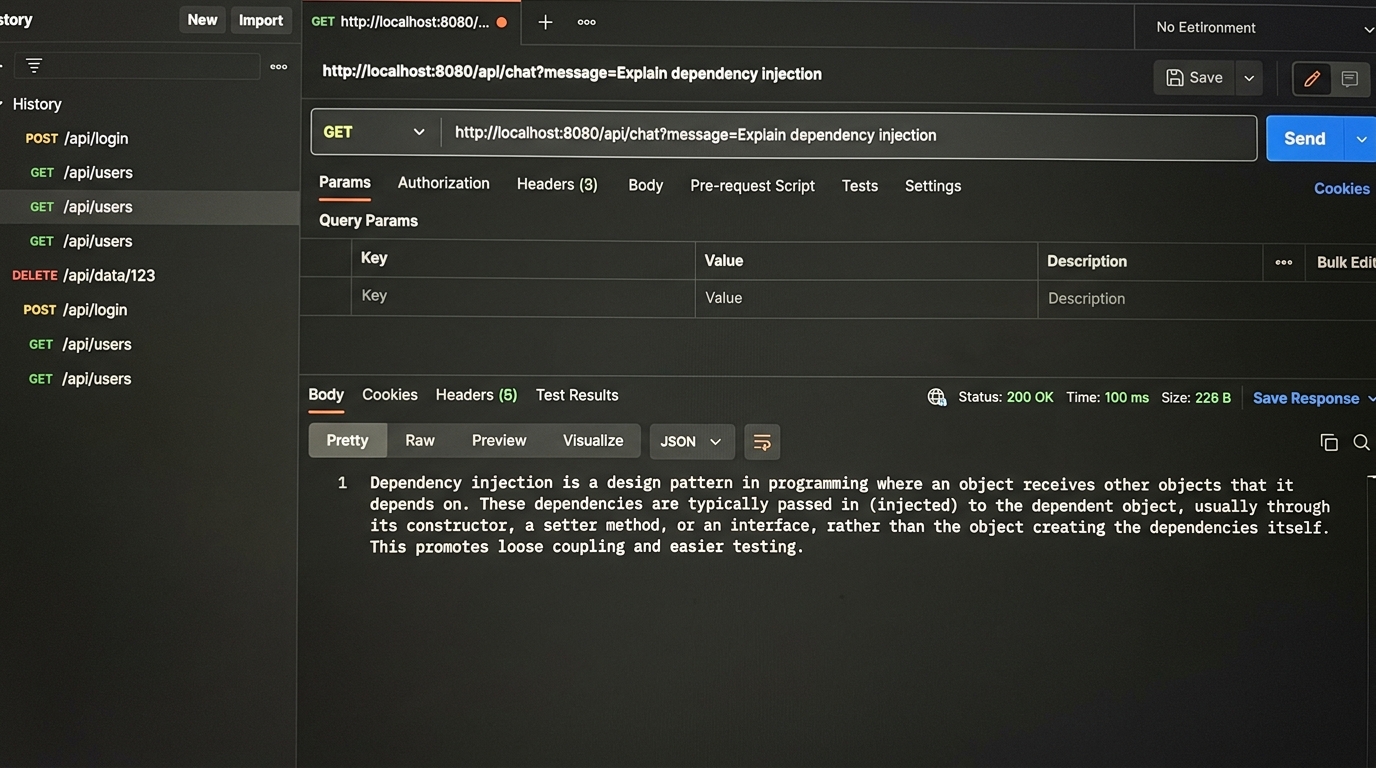
}Start your Spring Boot application and navigate to http://localhost:8080/api/chat?message=Explain dependency injection. You should see a text response generated directly by OpenAI!
Step 4: Advanced Structured Output (Java Records)
Returning plain text is cool, but in backend engineering, we usually want structured JSON. One of the most powerful features I found when learning how to use Spring AI with OpenAI is the OutputParser.
You can force OpenAI to return data that maps perfectly to a Java Record. Let’s say we want to generate a movie review.
public record MovieReview(String title, String summary, double rating, List<String> tags) {}

@GetMapping("/api/review")
public MovieReview getMovieReview(@RequestParam String movie) {
    return chatClient.prompt()
            .user(u -> u.text("Write a brief review for the movie: {movie}")
                        .param("movie", movie))
            .call()
            .entity(MovieReview.class);
}
Behind the scenes, Spring AI injects format instructions into your prompt, tells OpenAI to return JSON, and uses Jackson to deserialize it into your MovieReview record. It’s practically magic.

Pro Tips for Production Apps
If you’re moving this to production, keep these things in mind:
- Always document your AI endpoints: AI endpoints can have variable response times. Good API documentation helps front-end teams understand these constraints. I recommend checking out my Spring Boot API documentation tools review to find the best Swagger/OpenAPI generators.
- Use Streaming for long responses: If your prompt generates paragraphs of text, use
.stream().content()to return aFlux<String>. This provides a ChatGPT-like typing effect and prevents HTTP timeouts on the client side. - System Prompts matter: Always define a persona using
.system("You are a helpful assistant..."). It drastically reduces hallucinations. - Virtual Threads: AI calls are blocking I/O operations. If you are using Java 21, enable virtual threads (another great feature I covered in my Spring Boot 3.2 deep dive) to handle thousands of concurrent AI requests without exhausting your thread pool.
Troubleshooting Common Errors
When I first set this up, I ran into a few hiccups. Here is how to fix them:
401 Unauthorized: This means your API key is missing or invalid. Check that your OPENAI_API_KEY environment variable is properly exported before starting the Spring application.
429 Too Many Requests: You’ve hit your OpenAI rate limit. If you just created a new OpenAI account, you might need to add $5 to your billing dashboard. OpenAI requires a positive credit balance for API usage, even if you have ChatGPT Plus.
NoClassDefFoundError: Ensure you are using the correct Spring Boot version (3.2+) and that you have added the Spring Milestones repository. Without the milestones repo, Maven cannot find the spring-ai-bom.
What’s Next?
Now that you know how to use Spring AI with OpenAI, the possibilities are endless. You can easily swap out OpenAI for Anthropic Claude or Ollama (for local models) just by changing the dependency and application properties—your Java code doesn’t need to change at all!
Next, I recommend looking into Retrieval-Augmented Generation (RAG). Spring AI provides excellent abstractions for Vector Databases (like Pinecone or pgvector), allowing you to chat with your own PDFs and internal company documents.
If you build something cool, or if you need help documenting the complex APIs you’re about to build, don’t forget to review standard Spring Boot API documentation practices to keep your front-end teams happy.
Frequently Asked Questions
Spring AI requires Spring Boot 3.2 or higher, and Java 17 or higher. For optimal performance with highly concurrent I/O requests, using Java 21 with virtual threads enabled is strongly recommended.
Yes! Spring AI is designed to be highly portable. You can switch to models like Anthropic Claude, Google Vertex AI, Azure OpenAI, or even local models via Ollama simply by changing your starter dependencies and application properties.
A 401 error generally means that your API key is missing, improperly configured, or invalid. Ensure you have accurately set the OPENAI_API_KEY environment variable and it is being correctly picked up by your application.properties.